How film the screen of your Macbook Pro or Macbook Air? You can absolutely record videos from your screen in mac and even record sound from your macbook Pro or Macbook Air device. You can easily do video recording of the screen of your macbook Pro or Macbook Air device. manually. There are also mac screen video capture software very well designed so that you can record videos from your Mac screen while recording sound. Among them you will find Quicktime player Mac, Screen recorder, Apowersoft, Az recorder, Soundflower… and many others! In this article, you will learn about the best apps that will help you capture the screen of your macbook Pro or Macbook Air device. Good reading!

How to record your Macbook screen manually
Here are the steps to take in order to make a video recording of the screen of your Macbook Pro or Macbook Air device, in case you are using MacOS Mojave or an earlier version:
Use the shortcut Shift + Command + 5 on the integrated keyboard of your Macbook Pro or Macbook Air computer in order to display the on-screen controls that will allow you to “film” or “record” your entire screen or only part of your screen.
How to film the entire Macbook screen?
Here are the steps on how to video record the entire screen of your Macbook Pro or Macbook Air device:
- Click on the small screen drawing (with a circle on the right side, at the bottom). Your mouse then turns into a camera.
- All you have to do is click on a screen to start recording video from your Macbook Pro or Macbook Air computer screen. (you can also choose to click on the button Save which can be found in the onscreen controls).
- When you want to end the recording, press the stop button (the square in the circle) in the menu bar. The shortcut to stop recording the screen is as follows: Command key + Control key + Esc key (Esc)
A thumbnail of the video will then appear in the lower right corner of your Macbook Pro or Macbook Air device screen. It's up to you to drag this thumbnail onto your computer's desktop or into a specific folder in order to save it.
How to film a specific part of the Macbook screen?
Here are the steps to take a partial video recording of your Macbook Pro or Macbook Air device screen:
- Click on the small screen drawing (with a circle on the right side, at the bottom).
- Use your mouse pointer to determine the area of the screen you want to record.
- Now click on Save to start recording the part of the screen in question
- If you want to end the recording, click on the stop button (the square in the circle) in the menu bar. The shortcut to stop recording the screen is as follows: Command key + Control key + Esc key (Esc)
A thumbnail of the video will then appear in the lower right corner of your Macbook Pro or Macbook Air device screen. It's up to you to drag this thumbnail onto your computer's desktop or into a specific folder in order to save it.
Software for filming the screen of a Macbook
There are many effective software or applications available to record your Macbook Pro or Macbook Air computer screen. Below is a selection of very well designed software:
QuickTime Player, the application integrated into your Mac system
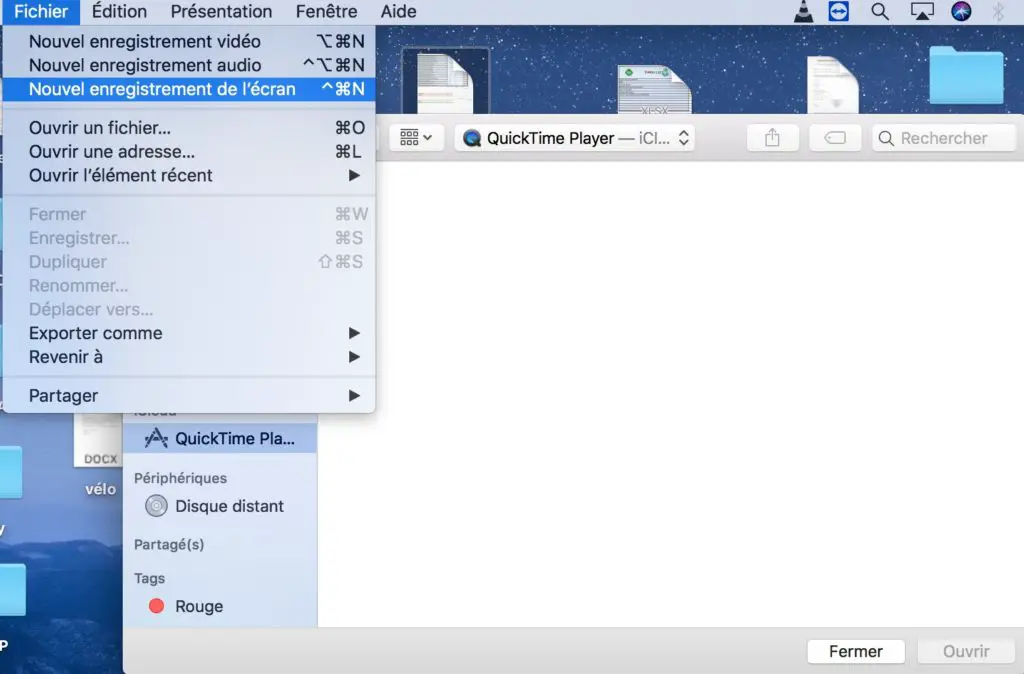
Here are the steps to follow in order to make a video recording of the screen of your Macbook Pro or Macbook Air device with the application. QuickTime Player:
- Open the application QuickTime Player on your Macbook Pro or Macbook Air computer (you can find it directly in the folder Applications or use the Finder)
- Select the tab File
- Click on New screen recording in the menu bar
You can change recording settings by clicking on the arrow next to the circle embedded in another circle (red and gray)
- You now have the option of recording your voice (or any other sound) at the same time as you record the screen of your Macbook Pro or Macbook Air computer. To do so, all you have to do is select a microphone. (the internal microphone for example).
- In order to start recording your Mac screen, click on the circle recessed in another circle (gray and red) then click somewhere on the screen to start record the entire screen or drag your mouse pointer torecord only part of your Mac screen (you must then click on the button Start the recording displayed in this area)
- If you want to end or stop recording the screen of your Macbook Pro or Macbook Air computer, click the stop button (the square in the circle) in the menu bar. The shortcut to stop recording the screen is as follows: Command key + Control key + Esc key (Esc)
Once the screen recording of your Macbook Pro or Macbook Air computer, it will save in the application QuickTime Player. After recording, you still have the option to edit your recording.
Apowersoft, the software for quality videos
The Apowersoft, very easy to use, will allow you to record your screen on Mac in very few operations. Indeed, this MacOS screen recorder will allow you to record the screen on Mac with the sound of the system, the microphone or even both at the same time. The recordings are of very good quality. A very good alternative to QuickTime Player to record everything that happens on the screen of your Macbook Pro or Macbook Air computer! This application is widely used for making demonstration videos for training or for video game tutorials for example.
Screen Recorder, the software to capture the screen in one click
This software is very useful for capturing webinars and online calls, as well as for recording instructions and video tutorials. You can also use this app to capture streaming videos as well as online events. To use this software, it's very simple. You have to:
- Configure the settings of the free video capture software by choosing the desktop capture area and then adjust the screen recorder settings according to your requirements
- To record the sound of the video, you will only have to press the REC button to start recording what is happening on the screen
- You will be able to edit the recording and then save it to your Macbook Pro or Macbook Air computer.
This Article will be useful to you in case you want connect a second screen to your Macbook device in order to extend your desktop so that you can work better on Mac screen recording.
