How to do a diaporama on Macbook Air or Pro? Do you want to create a Slideshow to scroll through images or photos directly on your Macbook Air or Macbook Pro device or even make a PowerPoint on Mac? It is quite possible, and in addition, it is disconcertingly simple! In this article, you will find the steps to follow in order to create a slideshow directly from your Apple laptop then also how to create a Slideshow using PowerPoint and its equivalent Keynote that's already on your Macbook Air or Macbook Pro computer. Good reading!

Create a slideshow project directly on a Macbook device
Here are the steps to create a slideshow directly on your Macbook Air or Macbook Pro device:
- Open the Photos app on your Macbook Air or Macbook Pro computer (you can find it directly in the Applications or by opening the Finder)
- Select the photos or images you want to appear on your future slideshow (you will have the opportunity to add or delete photos and images throughout the creation of your slideshow)
- Select the tab File
- Click on the button Create and then on Slideshow then to finish on Photos
- Enter the local menu Slideshow and select New slideshow
- You must then name your slideshow in the field Slideshow name and validate by clicking on OK
- If you want to rearrange the order in which your photos or images appear, just drag them into the order you want at the bottom of the window.
- Push the button Themes: to choose the theme of your slideshow. (the theme can also be modified throughout the creation of your slideshow). Depending on the theme you have chosen, the Image layout, text size, police, text position and transitions between each slide will differ.
- You also have the option of choosing music during your slideshow. To do so, nothing could be simpler: click on the button Music then the down arrow next to Library to select one or more songs of your choice.
- If you want to change the display duration of each slide, then click on the button Duration in order to either:
- Fit the slideshow to the length of the music you selected from the library
- Set a specific display duration for the slideshow
- Assign a transition to the entire slideshow
- Fit slides to screen size
You can see what your slideshow looks like at any time by clicking the button Preview (click a second time on this same button to go back to edit mode)
You just have to press the button Litterature to scroll through your brand new slideshow. In order to pause a slideshow, you can click the button Space the built-in keyboard of your Macbook Air or Macbook Pro computer. You can exit the slideshow at any time by clicking on the button. I.
Use Power Point on Mac to create a slideshow
The Power Point software is fully compatible with Macbook devices, then you just need to download the correct version. the Power Point software will then allow you to make slide shows, made up of several slides containing text, photos or images (in order to support a presentation or to talk about a trip for example).
Here are the steps to create a slideshow using Power Point on your Macbook Air or Macbook Pro device:
- Open the Power Point software on your Macbook Air or Macbook Pro computer
- Choose an "appearance" in other words, the theme of your slideshow
- Add slides by clicking New slide
- Now edit your slide by inserting images, photos, text, tables, graphics, videos ...
You just have to save your Power Point and open it in order to scroll through it in slideshow mode.
Use keynote to create a slideshow on your Macbook
Keynote is a great alternative to Power Point software. It indeed offers a wide variety of original choices and very well designed. The effects offered are sublime. the browser offers you more than thirty themes, each more beautiful than the next.
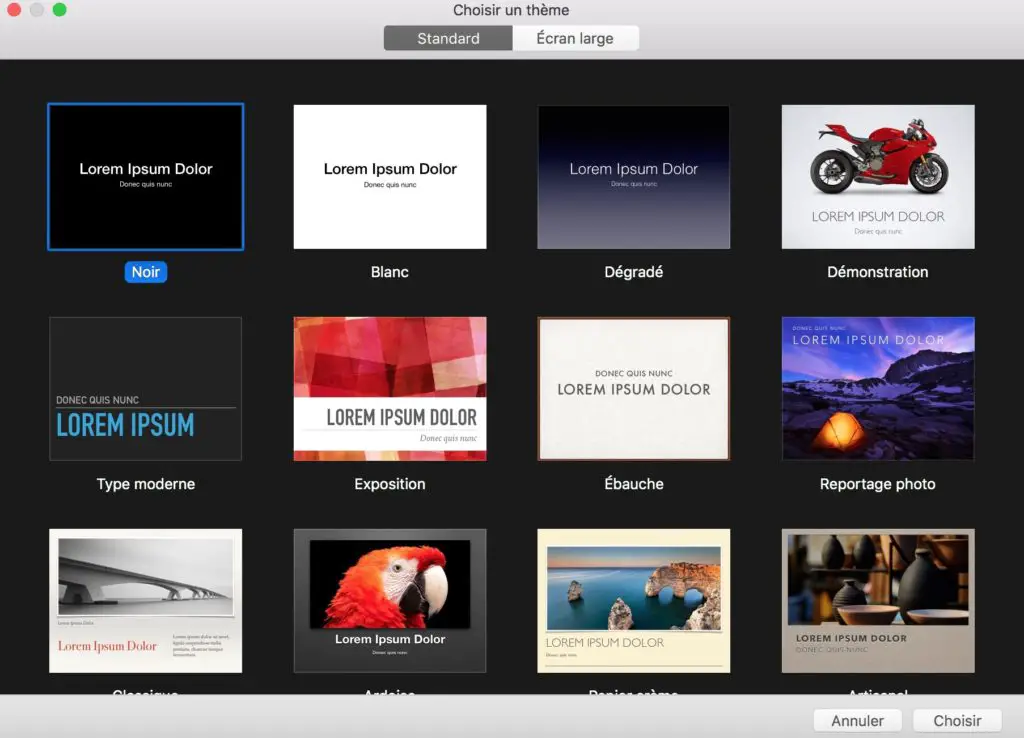
Here are the steps to follow in order to create a slideshow using Keynote software on your Macbook Air or Macbook Pro device:
- Open the software Keynote on your Macbook Air or Macbook Pro computer (you can find it directly in the folder Applications or by opening the Finder)
- Click on New document
- Select the theme that you like the most (again, depending on the theme you have chosen, the Image layout, text size, police, text position and transitions between each slide will differ)
- Click on Add a slide (in the top sidebar)
- Edit your slides by modifying the text and including all kinds of media (videos, graphics, tables, movies, images, and even Youtube or Vimeo videos directly from your presentation).
This Article will be useful if you want to create several slideshows at the same time by plugging in a dXNUMXnd screen to your Macbook device for a larger desktop.
