You might be wondering how these Instagramers manage to take such great photos with an iPhone. Indeed, there are some technical et settings effective in order to beautiful photos of oneself or landscapes on his iPhone. It is possible to vary the shots, to take selfies or portraits in HD, to capture unique moments, and all thanks to your iPhone. You also have the possibility of carrying out a shooting by taking a picture of yourself, using your iPhone device. Thus, you will find in this article the different methods to succeed in taking successful pictures that will generate a maximum of likes. Good reading!

Taking beautiful photos with your iPhone involves choosing the right settings
Indeed, if you wish get your shots, it is imperative to know master the settings from your iPhone camera. Taking pictures like a professional photographer with an iPhone device is within everyone's reach! Here are the steps to follow in order to set his iPhone to take great photos every time.
Choose the right mode according to the nature of the photo
If you want to take a photo of a landscape with your iPhone, you will have to opt for the panorama mode which will allow you to take pictures of wide shots through the lens of your Apple device. This implies that you have to be quite far from the landscape, because in mode panorama, the iPhone lens may distort items that are very close to it.
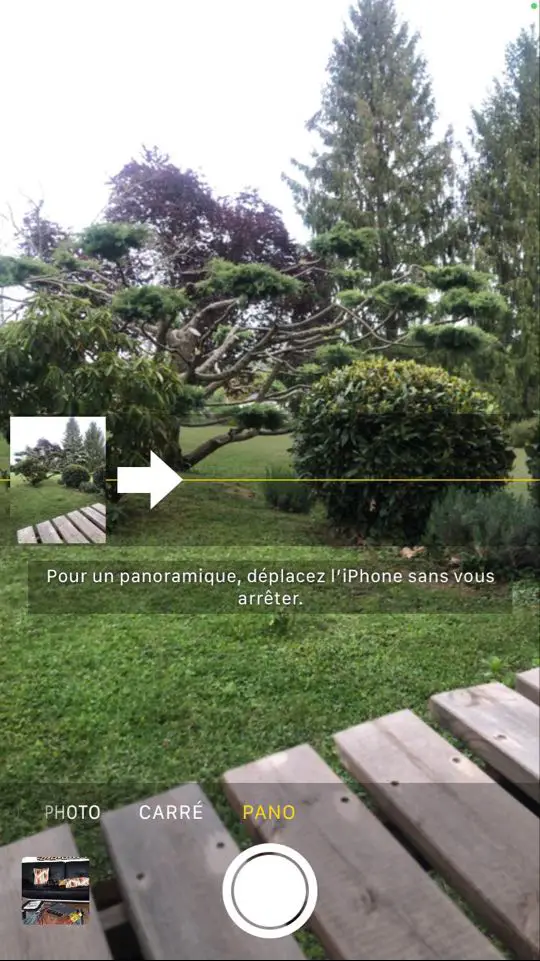
Here are the steps to follow in order to select the mode Panorama for your photos:
- Open the application Camera on your iPhone
- Swipe your screen until you find mode Panorama
- Press the camera button then move your iPhone in the direction of the arrow, trying to move as little as possible and without interruptions
For make a nice self photo with an iPhone, in other words to make a Selfie, you will then need to use the Portrait mode, which is available on iPhones X and later models. This mode allows your iPhone to create a depth of field effect with thebackground of the photo slightly blurred so that you appear as sharp as possible on the shot. In addition, in Portrait mode, the application Camera will tell you if you are too close or too far from the lens, or if the shot needs more light. It's hard to miss your selfie in such conditions ...
Here are the steps to follow in order to select the mode Portrait for your photos:
- Open the application Camera on your iPhone
- Swipe your screen until you find mode Portrait
Remember to turn the direction of the lens towards you.
You can also use the Live photo mode in order to take pictures animated or HDR mode which will allow him to take a series of three photos in burst mode with a single exposure level for each shot. When these three photos are merged, the strong contrasts will then be attenuated in order to give substance to your photo. the burst mode is preferred when taking pictures in full motion, in action, when things move fast. Ideal for sport events, concerts or when you take pictures of your friends as naturally as possible, this mode will allow you to capture the slightest subtleties of the moment. Just hold the capture button to record 10 photos per second.
Opt for high definition to take quality photos with an iPhone
If you want to take beautiful photos of quality, we strongly advise you toactivate high definition on your iPhone device. Indeed, this mode will allow your iPhone's camera to select a optimal light exposure so that the photo is the sharper as possible. But be careful, you have to use high definition when you are sure to be able to take a picture in optimal conditions: no movement, not too many shadows, on a stable surface ...
Take well-framed photos with Grid mode
Le Grid mode allows you to access a grid option in order to always look good center your photos on your iPhone. Ideal for centering faces or a particular object, the Grid mode gives you a perfectly straight and centered horizon line so you never go wrong. To activate it, nothing could be simpler:
- Appointment in Part Settings from your iPhone device
- Select Camera
- Move the slider to activate the Grid mode
Filters and photo retouching to perfect your shot on the iPhone
IPhone lets youedit your photos without resorting to third-party applications. You can indeed adjust colors of your photo, adjust la brightness, use filters or even crop your photo for improve et beautify your pictures.
Crop a Photo on iPhone
If an element has entered your photo by mistake or you dislike, you can then crop your picture. Here are the steps to follow in order to crop your shot:
- Open the application Photos on your iPhone
- Choose the photo you want to crop
- Press Edit
- Tap the toolbar at the bottom left of your iPhone screen
- Manage your photo framing
- Press OK to save your freshly cropped photo
Add filters to make your final photo a success
Instagram is aware of this, the filters do their job well: they certainly embellish your shots. They allow you to aging a photo,mitigate oraccentuate some colors, play with contrasts… Here are the steps to follow to add a filter to a photo taken with your iPhone:
- Open the application Photos on your iPhone
- Choose the photo you want to edit
- Press Edit
- Press Filters (materialized by three small circles one inside the other in the toolbar)
- Choose the filter that suits you best
Whether it isintense and hot, spectacular, Monochrome,silver, Black, you will find your happiness for sure! Note that it is also possible to change the background of a photo on your iPhone with photo editing apps. If the filters offered by iOS are not suitable for you, then you can upload your content to the app Instagram (which offers many filters), choose your filter then save your photo in the camera roll of your iPhone. You can also edit your photo with more powerful apps like Photoshop for example.
The color and brightness settings of your photo
Once your photo is taken, you can still change color or brightness of the cliché. This option will allow you to bring More light to a photo, or on the contrary, of thedarken. Again, go to your photos then select your snapshot, press Edit et adjust clarity of your photo by playing with the contrastes and brightness. You can also adjust colors or transform your image in black and white.
For a successful shot with the iPhone, do not forget to focus!
This is the key to a great photo: the tuning, not to be overlooked! When your image appears on the screen, touch it until a yellow square appears: this indicates that the focus is being achieved. So you can focus on the foreground or the second plan depending on the purpose of your photo. You can try to focus in several places to determine what will look best in your photo and find the ideal exhibition. You can also make a manual focus by pressing a few seconds on your iPhone screen until the word unlocking appears. You just have to play with the small sun wheel to adjust the focus of your shot.
Enhance your photos using the right accessories
More than a step for successful shots every time, the accessories: they will allow you to take beautiful photos in the best possible conditions. So you can use the telephoto in order to benefit from a optimal zoom on your iPhone, handy when you want to take photos from afar! Also think about Fisheye, which will surely give him back your shot original: it gives you a very wide angle of view so that a distortion of straight lines is formed. For some very close shots, remember to bring a macro lens. If you want to take a picture without your hands, opt for the tripod but ban the selfie stick. The stick is visible in the photo and it spoils the final shot.
